Creating the Specular Map
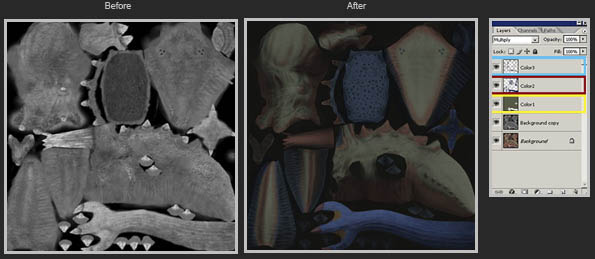
With the diffuse map completed, it’s time to focus on the spec maps. I’m going to use two different maps to sell the specularity of the model. The first map that I’m going to work on is the color specular, a color spec is basically a map that alters the color of the specular highlights. When it came to the creature I used a variety of colors to help enhance and offset the diffuse map colors. First I’m going to start on how I made the map in question. The first thing I did was merge all of the layers in my diffuse map, once I did that I created four new layers. The first layer is a de-saturated copy of the base layer, then I created a second layer called color 1, the third layer color2, and then color3. From here I set the numerical color layer properties to “color”, and started filling them with the desired color tones. First up is color1 which is green, I chose green because I felt that it would play off of the semi warm mid tones throughout the creature’s skin. Next up is color2; I choose blue for this because it offers up the highest level of shininess, which is exactly what I wanted to help sell the moist and clammy nature of the tongue, back hump, and soft tentacle under skin. Last but not least is color3, I used dark orange in some of the shadow areas to basically warm up and play off the dark values in the diffuse map.
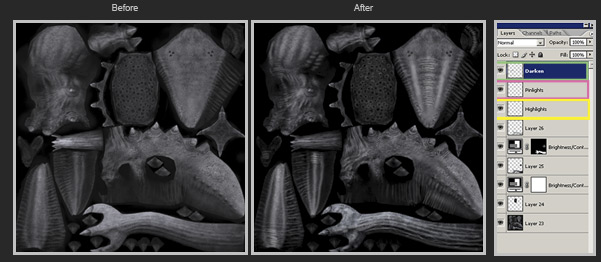
Now that the specular color map is completed it’s time to move the specular level, otherwise known as specular power “Special note: different engines and modeling applications have various names for this”. The specular levels map basically alters the intensity and location of the highlights based on their black/white values. 100% white receives the brightest intensity of light and a 100% black doesn’t receive light at all! It’s good to strike a middle ground and incorporate a mix of white, grey and black. That being the case you can see below that I took my color spec and removed the colored layers. Once I did that I darkened the base layer by overlaying the light map on top of it, after that I merged the two. Then I added a number of layers reflecting the highlights, pin lights, and darken areas. The highlights layer was used to created broad lights across large surface areas and pin lights were used for the opposite. The darken layer was used to tone down super bright spots such as the tip of the barb and teeth, this is especially important since some game engines will blow out anything approaching 100% white. On a last note I wanted to point out that I refrained from using any kind of grain overlay often seen in human skin. I choose not to do so due to the fact that the creature’s skin already provides a nice scattered effect. Adding more grime and noise on top of the established skin would create a muddy effect when shown in hot lighting situations, this looks even worse when the resolution is reduced!
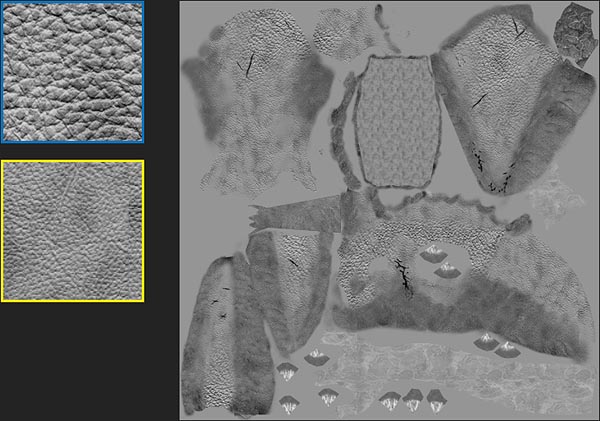
Now at this point I have to ask myself, do I want to use the skin that I made for the diffuse map and bump that? Or do I want to use another skin source that’s a little more uniformed? Well I choose the latter and I did so due to the erratic nature of the diffuse skin. If you think back to when I was applying all of skin materials in the diffuse map you’ll see that it was made up of numerous “clone/stamp” elements. While those elements were fine for selling the diffuse, they simply wouldn’t hold up in the bump map. Bumping out the diffuse skin would have resulted in a noisy output, which would break the illusion and believability I’m going for. That said I used two different tillable materials as an alternative. The cool thing about these materials elements is that they play off of the original skin quite well! So I created two new layers and filled one with the big skin pattern and one with the small skin pattern. Then I took my eraser brush and gradually blended the two patterns, the reason for this was simple. Most creatures skin in real life is almost never uniformed and tend to contain variations throughout.
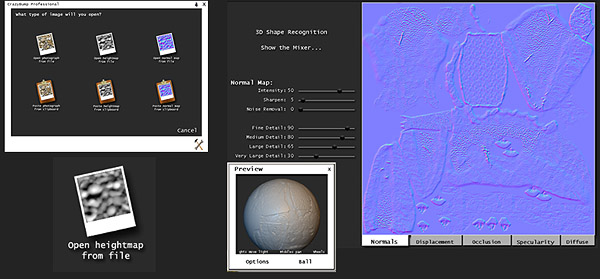
With my bump map completed, I moved on to generating the normal map, for this I used “Crazy Bump”. Crazy bump is an awesome program that does exactly what it say’s, it bumps stuff really well! All kidding aside Crazy Bump can produce other maps as well such as occlusion maps, displacement maps, specular maps, etc. That said the normal map could also be generated using the Nvidia normal mapping plugin. In any case you can see the settings that I used from the image below.
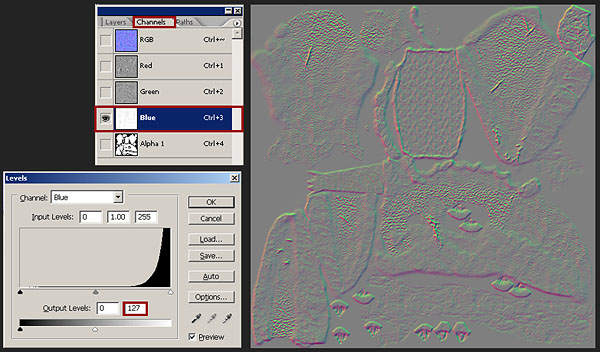
Now that I generated my normal map, it’s time to overlay it onto my baked normal map. Of course before doing so I needed to make a few tweaks, first being the adjustment of the blue channel. This is really important since having the blue channel unadjusted would create a few odd results, most notably it wouldn’t behave well with my baked map. So in order to get things straight, I to adjust the levels in the channel itself. The first thing that I did was go into my channels and dialed the number down from 255 to 127. By the way the way there are a few cool Photoshop actions that handle this.
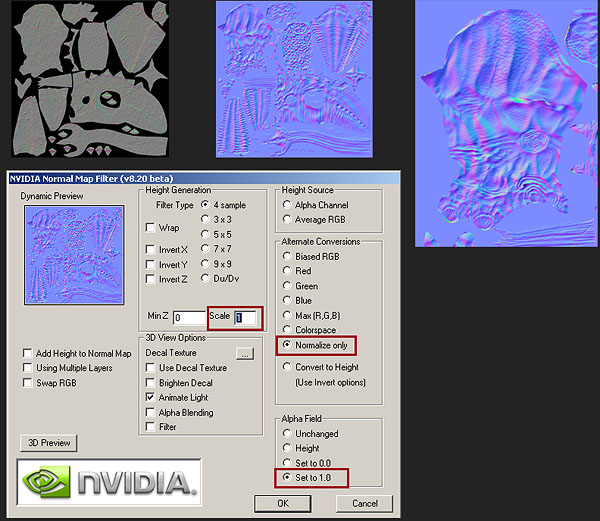
Continuing work on the normal overlay, I took the mask that I created for the texture and copied and pasted the new overlay onto the baked normal map. I then reduced the opacity of the overlay layer to 45%, this was done so that the skin maintains a subtle feel to it. I personally like bumped surfaces that don’t beat you over the head on how exaggerated they are, as I said before a little goes a long way! Now that the overlay has been applied to the baked surface, it’s time for me to re- normalize the map itself. I do this by running the Nvidia Normal map filter with the settings shown below. This will re adjust the vector values. I like to think of the previous step as the “Reset Xform” for Photoshop when it comes to normal maps!
Creating the Bump Map / Normal Map
Well now that the spec maps are created its time to move onto creating a grey scale bump map. A bump map pretty much uses the black areas to indicate depth, white areas indicating height and grey staying neutral to the surface. Once the bump map / height map is created it’ll be converted to a normal map overlay. This step is super important since the bump map will serve as a base to accentuate subtle details within the skin surface, meaning a bad bump can and will destroy the hard work done in the previous steps! That said I’m going to explain how I created my bump map. The first thing I did was merge all of the layers in my diffuse map, with the exception of the mouth skin, scars, teeth, underbelly skin, and tongue distortion. I then created another layer and filled that layer with 50% grey, once I did that I moved all of the un-merged layers on top of the grey fill layer. I then took those separate layers and de saturated them, along with adjusting the contrast.
I
I
I
I
I
I
I
I
I
I